Mint is a herbaceous perennial which dies back in late Autumn but bursts back into life in Spring. The vigorous nature of Mint makes it a relatively easy plant to grow. However, it is also a very invasive plant that will spread through the plot if left to its own devices.
Mint sends out lateral root runners under the soil that enable it to surface in another part of your plot and at the same time compete with your other plants for water, nutrients and light.
In this article, we examine how to grow Mint successfully without letting it dominate your garden.
Preparation
The ability to encroach into the space of other herbs and plants in the garden is normally overcome by either growing Mint in containers or by taking measures to prevent the spread of the roots.
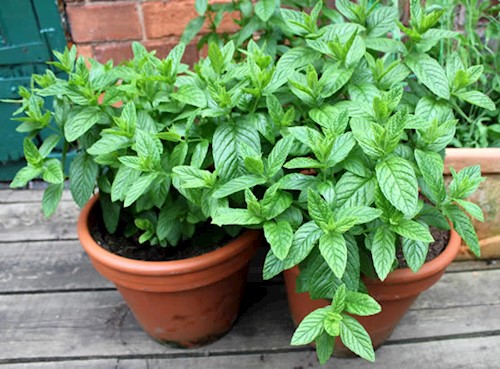
Growing Mint in Containers
If you wish to grow your Mint in the soil rather than in a container on the patio/decking, then use the following trick for restricting the sprawl of Mint.
Restricting Mint in Soil
Use a large plastic plant pot (at least 15 inches deep) with the bottom cut out of it that enables the roots to grow downwards but not sideways.
Dig a hole in the herb garden/soil where you want to locate the Mint and put the container with no bottom into this hole. Leave around an inch of the rim of the container above soil level. The pot will act as a barrier to the lateral spreading of the Mint root runners and so keep the plant in check.
Alternative Barriers
You could also use brick/pot/stones to form mini barrier walls under the soil between the mint and the next herb in your herb garden. However, beware that if there are any cracks left in such a wall then the Mint roots may still find a way through.
Sowing
Mint can be grown from seed, although growing from seed is not always successful. Because Mint is so easy to propagate from cuttings, this is often the chosen
method of obtaining more Mint plants.
If growing from Sow seed thinly in 3 inch pots and cover with a 1/2 cm layer of fine compost. Water the compost and place a clear plastic bag (sandwich bags
are ideal) upside down over the pot to help retain moisture. Secure the plastic bag with an elastic band.
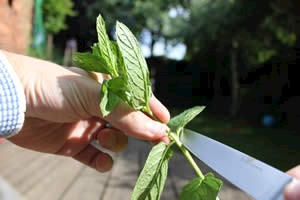
Growing Mint from cuttings
- If growing from cuttings it is vital that you inspect the plant you propose to take the cuttings from before you do so. If the plant shows any sign of being affected by pest or disease then do not use that plant to propagate from. The most common Mint disease is the fungal Mint Rust (see below).
- Use a sharp knife or sharp scissors to take a cutting just below a leaf node.
(where leaves are emerging from the stem).
- Remove any established leaves from the bottom half of the cutting
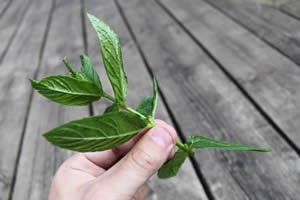
- Cut the growing tip off the stem (found at the top of the cutting). Make sure to handle the cutting carefully, not squashing its main stem in any way.
- You can now choose to place the cutting into either water or compost.
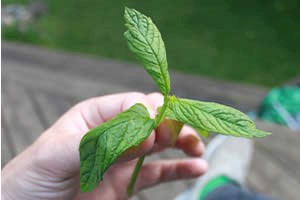
Growing Cuttings in Water
Growing in a glass of water can be great fun if your kids are involved, as they can see the roots forming in the water.
- Ensure that at least the bottom half of the cuttings are submerged in the water.
- After about a week, you will see roots starting to form.
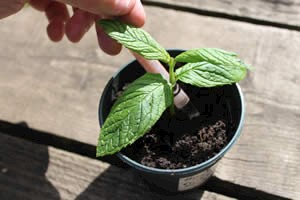
- Wait another week or so, then pot the cuttings into the containers you wish them to grow in.
- Throughout this period, ensure you keep the water level topped up as required.
Growing Cuttings in Compost
Alternatively, you can place the cuttings into seed modules, 3-inch pots, or directly into 7-inch or 12-inch pots. This saves the need to transplant again when the cuttings have taken root.
Steps for Planting in Compost:
- Insert the cutting into the hole and gently firm the compost around it.
- Fill the container with compost.
- Make a hole in the compost at least half the length of the cutting — you can use a dibber or pencil for this.
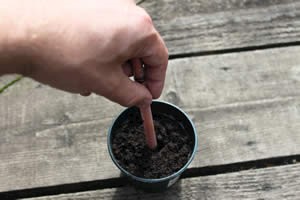
- Put the bottom half of the cutting into the hole. Use the dibber/pencil to firm the compost around the cutting taking care not to crush the stem.
- Mint does not like to dry out so it is essential to keep the compost moist whilst your seedlings are establishing. When your cutting is in pots you can help moisture retention by using an upturned clear plastic bag over the pot as described when planting from seed.
Position
Mint will thrive in a sunny position but will also tolerate some shade.
Growing more than one type of Mint
Although Mint will co-exist with other varieties of Mint it is widely believed that the qualities of the flavour and scent of the plants are reduced when doing so. Therefore if you want to have different varieties in a large container then plant the varieties in small sub containers and place these containers in the larger container.
Soil type
Mint likes a rich, soil that is fairly free draining although it does not like the soil to dry out.
Tending
Dividing and Re-potting
- When growing Mint in containers, once the root system has filled the pot, lift the plant out and divide it into 3 or 4 smaller plants.
- Re-pot each divided plant in the center of a new container, filling in with additional compost.
- This should be done in spring to encourage vigorous growth in the new containers.
Managing Growth
- If your Mint plants become too large, consider preserving the excess for winter use.
- Alternatively, regularly trim the growing tips to encourage bushy growth rather than long, straggly stems.
Watering
If growing Mint in terracotta pots, which lose moisture quickly through the walls, line the pots with old compost bags to help retain moisture.
Mint does not tolerate drying out, so ensure regular watering.
Harvesting
Before winter, you can cut the stems back to a couple of inches above the soil. This will give you a bumper crop of Mint that you can preserve by either:
- Chopping into pieces small enough to put in ice cubes trays, top up with water and freeze. You can then add the required number of ice cubes to drinks (fantastic with Apple juice) or for adding to Gravies/mint sauce etc.
- Tying around the bottom of the stems to create bunches of Mint that can be hung in a ventilated dry space to air dry them. See Preserving Herbs for more information.
Varieties
There are many varieties of Mint, each with its strengths.
Spearmint (Mentha spicata)
- Like other varieties, it will spread laterally if not contained.
- A hardy perennial that grows to a height of about 45-50cm.
Moroccan Mint
- Well known for its use in making great-tasting tea.
- Offers a strong, refreshing flavor ideal for beverages.
Pineapple Mint
- Adds a decorative touch to your garden while still being useful in culinary applications.
- Recognized for its attractive variegated leaves, featuring white/cream and green coloring.
Diseases
Mint Rust is a fungus that appears as small rust (orange) coloured patches that appear on the underside of the leaves of the plant.
If you have a plant showing signs of Mint Rust then remove it from the garden and destroy it. This is because it can easily spread to other plants and the soil thus affecting plants introduced in the future.
If you found this article helpful, consider sharing it with others who may enjoy the benefits of home gardening.