There can be few better garden pleasures then eating fresh garden peas straight from the pod. Their smell, texture and flavour are fantastic. In this guide we will cover all aspects of growing peas from sowing to harvest including peas grown in containers as well as soil.
Whilst traditionally most peoples idea of growing peas would be for the shelled seeds today peas are seen as a more versatile crop where the seed pods of the mangetout (flat, non stringy seed pods) and sugar snap peas (fleshy, non stringy pods) can be eaten. In addition the young tender shoots of peas can be harvested and eaten.
Pea shoots have recently become very fashionable in high end dining for their use in ‘micro salads’ and as garnishes. If growing indoors then try trays of pea shoots which get efficient use our of the space with a short sow to harvest time.
Preparation
Improve the soil structure by digging in some garden compost in (if using shop bought compost then a general multi-purpose compost is fine).
Using a soil rake, rake the soil till it has a fine structure that will help carry oxygen and water to the plant roots.
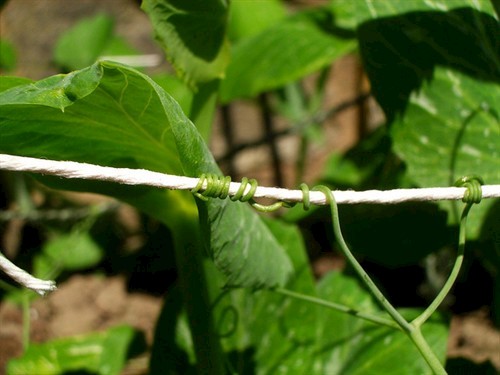
To achieve a good crop, peas must have vertical support that they can attach their tendrils to. This enables them to grow vertically, thus making the best use of the available sunlight and space. The height of the pea plant will depend on which variety you are growing (see below).
Some varieties can use Pea Sticks (small thin sticks around 60cm in height) to support them, these can be bought or simply improvised from sticks from other plants in your (or your neighbours’) garden (hazel twigs are commonly used).
Other taller growing varieties will need support from one of several options including:
- a net that is attached to a vertical support at each end or the net
- a wooden trellis
- a structure such as a a wigwam made from garden canes / willow / other sticks similar to wigwams used for growing runner beans and sweet-peas.
- string stretched between two canes / other supports
Choosing a container
If growing peas in containers, then make sure to choose a container that takes soil to a depth of at least 25cm, as peas have roots that reach this depth. Line the container with some old crocks or large gravel to help free drainage and use a multipurpose compost that will retain moisture. If using a terracotta container, then line the sides with an old compost bag that will help to prevent moisture loss through the walls of the container. If growing in containers, then choose a dwarf or low-growing variety.
Sowing
Tips for Sowing Peas
Accelerating Germination
To speed up germination, soak your pea seeds in a bowl of water overnight before planting.
Sowing in Guttering
For an easy planting method, consider using a length of household guttering. Fill the guttering with compost and sow your pea seeds inside. Once the seeds have germinated, prepare a small trench in your vegetable patch. Position one end of the guttering at the start of the trench, then gently lift the other end to slide the seedlings into place in one smooth motion.
If using this method, transplant the seedlings promptly after germination. Peas develop deep root systems, and leaving them in the guttering for too long may restrict root growth.
Direct Sowing in Soil
If you prefer not to use guttering or pots, sow your pea seeds directly into the soil. Plant them in a zig-zag pattern, alternating on either side of your vertical support system. Sow seeds at a depth of 5cm, then cover them with soil. Use the head of a rake to gently press the soil down, ensuring good seed-to-soil contact.
When spacing rows, match the row distance to the expected height of your chosen pea variety. For optimal use of space, consider growing catch crops such as radishes or additional pea rows for harvesting as pea shoots.
Station Sowing
Station sowing involves placing 2 or more seeds about 1cm apart at each point where you want a plant to grow. This method helps reduce gaps from unsuccessful germination.
Whether sowing or transplanting seedlings, leave an 8cm gap between plants for adequate space.
Extending the Harvest Season
To extend your pea harvest, sow seeds successively. Plant new seeds as earlier crops near their harvesting stage. Choosing a combination of early, mid-season, and late-cropping varieties can further extend your pea harvest throughout spring and summer.
Sowing for pea shoots
If you are growing solely for pea shoots then you do not need to sow in a deep container. Indeed a seed tray is quite suitable for pea shoots.
Top Tip – if growing for pea shoots only then rather than using expensive gardeners seed packets you can use the much cheaper, larger packets of dried peas that are available from supermarkets and health food shops.
Position
Peas scramble vertically and smaller gardens can make use of this by using the peas to form a green screen on balconies or to mark the boundaries of your vegetable plot.
Peas should be positioned in a space that receives plenty of sunshine but will tolerate a small amount of shade.
Being a legume, peas are excellent at fixing nitrogen in the soil and so are often positioned where root vegetables have grown the year before and where brassicas (leafy green vegetables that require lots of nitrogen) will be grown the year after. This principle is known as crop rotation and ensures that the maximum potential is achieved from the soil year after year.
Soil type
Peas like quite a rich moisture retaining soil but one that is free draining. Therefore if you have a clay or a sandy soil then dig in organic matter such as garden compost or well rotted manure. If you have a soil testing kit ensure your soil has a pH of 6 or more.
You can also add a mulch around the pea plants once they have attached themselves to the vertical support to help retain moisture in the soil and reduce weed growth.
Tending
If you are sowing early spring varieties make sure to protect peas from any occasional late frosts by using a cloche or garden fleece to cover the young peas.
Use a hoe / trowel / hand (depending on the size of your plot) to remove weeds that might compete for light, soil nutrients and water.
Water sparingly before flowering – enough to stop the soil drying out. Over-watering before the plant begins to flower can increase foliage but reduce yields. Water generously when the peas come into flower so the water penetrates deeply into the soil. Remember peas have deep roots and will follow the water down, down, down. Therefore, don’t water frequently, leave for 10-14 days, and then water again, and keep doing this whilst the peas inside the pods are starting to swell up.
Harvesting
When to Harvest
Shelled varieties should be ready to harvest within about a month of flowering. The mangetout and sugar snap varieties can be harvested when not fully developed or left longer to reach maturity. Either way, they enable shorter growth periods than the shelled varieties.
How to Harvest
Harvest from the base of the plant upwards by cutting the pods off where the pod joins the stem. To encourage a longer growing season and ensure the tastiest peas, harvest as soon as the peas have swollen to their full size. You can harvest the sugar snap and mangetout varieties at any point. Again, avoid leaving them on the plant when they are ready.
Saving Seeds
You can save seed from your crop to enable free plants next year. Simply leave some pods on the plant at the end of the plant’s growing season. The pods and peas will dry out and turn brown. When they are completely dry, you can write the name of the variety on a brown paper bag, pop them in it, and store in a dry, dark place until next year. If there is a lot of rain at the time of seed collection, then bring the pods indoors and allow them to dry in a well-ventilated space.
Enjoying Your Peas
While eating peas as you pick them is for many the best way to enjoy them, you can also use them in salads, soups, and risottos. Mint makes an ideal partner in taste to peas, as does dill.
Varieties
Petit pois produce small round seeds that need to be shelled.
Yields tend to be higher from the edible pod varieties.
Diseases
Mice and Birds
Mice are notorious for their love of eating pea seeds. If mice are a problem, then make sure to cover your rows with a cloche or garden fleece. Alternatively, sow in a length of guttering as described above and place the length of guttering somewhere out of the reach of the mice. Birds can also target seeds and very young pea seedlings, so placing garden fleece or some kind of netting over your rows is advisable.
Pea Moth
The other most destructive force on peas is the Pea Moth, which lays its eggs on the leaves of the pea plant. When the eggs hatch, the emerging caterpillars burrow their way into the pea pod and once inside they feast on the seeds, thus ruining the crop.
Combating Pea Moth organically can be done by using special insect-proof mesh to cover the pea plants, thus forming a barrier to the moths coming into contact with the plants.
If you are not organic, you can use synthetic pyrethroid insecticide, which can be sprayed on the crops when the plant comes into flower. Consult the instructions that come with the insecticide for safe application.
Powdery Mildew
Peas can also suffer from powdery mildew, although this tends to be when the plant has finished producing pods.
Photo credits: flickr.com/photos/maria_keays
If you found this article helpful, consider sharing it with others who may enjoy the benefits of home gardening.